
Discovering carpenter bee damage on your wooden structures can be disheartening. These bees, while important pollinators, can create unsightly holes and weaken the integrity of wood through their nesting habits. If you’ve found evidence of carpenter bee activity, it’s crucial to address the damage promptly to prevent further deterioration. In this comprehensive guide, we will walk you through the steps to effectively repair carpenter bee damage, restore your wooden surfaces, and protect them from future infestations.
Identifying Carpenter Bee Damage
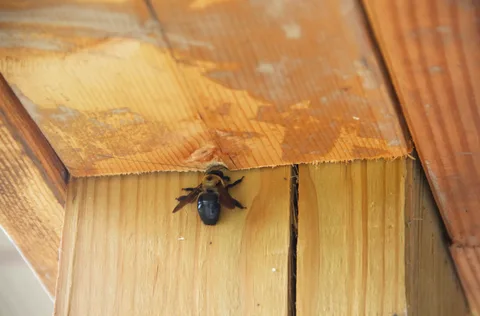
Before diving into the repair process, it’s essential to correctly identify the damage caused by carpenter bees. Common signs include:
- Round Holes: Carpenter bees create perfectly round entry holes, typically 1/2 inch in diameter.
- Tunnels: These bees bore into wood, creating tunnels that can extend several inches.
- Saw Dust: You may notice small piles of sawdust (frass) below the entry holes, a clear indication of active boring.
- Staining: Yellowish stains below the holes, caused by bee excrement, can also be a sign of infestation.
Assessing the Extent of Damage
- Initial Inspection: Carefully inspect the affected areas to determine the extent of the damage. Look for multiple entry holes and the length of the tunnels.
- Probe the Wood: Use a thin probe or wire to gently explore the tunnels and estimate their depth and direction. This helps in understanding the internal damage.
- Check for Structural Integrity: Examine if the damage has compromised the structural integrity of the wood. If the wood feels weak or spongy, more extensive repairs may be necessary.
Materials Needed for Repair
- Wood filler or wood putty
- Carpenter’s glue
- Sandpaper (various grits)
- Putty knife
- Wood hardener (for severe damage)
- Paint, stain, or varnish (for finishing)
- Safety goggles and gloves
Step-by-Step Repair Process
1. Cleaning and Preparing the Area
- Remove Debris: Clear out any loose debris or sawdust from the holes and tunnels using a vacuum or compressed air.
- Treat for Bees: Before repairing, ensure no bees are present. Apply an appropriate insecticide if necessary and allow time for it to take effect.
2. Filling the Holes and Tunnels
- Small Holes and Tunnels:
- Use a wood filler or putty to fill the holes. Apply it with a putty knife, pressing firmly to ensure it fills the entire cavity.
- For deeper tunnels, use a syringe to inject wood filler deeper into the tunnel.
- Large or Extensive Damage:
- If the damage is severe, reinforce the wood with a wood hardener. Apply the hardener according to the manufacturer’s instructions and allow it to dry completely.
- Once the hardener has set, fill the holes with wood filler or putty.
3. Sanding and Smoothing
- Initial Sanding: Once the filler is dry, use coarse-grit sandpaper to smooth the filled areas.
- Fine Sanding: Follow up with fine-grit sandpaper to blend the repaired areas seamlessly with the surrounding wood.
4. Finishing
- Painting or Staining: Apply paint, stain, or varnish to the repaired areas to match the rest of the wood. This not only enhances the appearance but also provides a protective barrier against future infestations.
- Sealing: Consider applying a sealant for added protection, especially for exterior wood exposed to the elements.
Preventing Future Damage
To prevent future carpenter bee infestations, take the following preventive measures:
- Paint or Varnish Wood: Carpenter bees prefer untreated wood. Applying paint or varnish can deter them from boring into the wood.
- Use Hardwood: Opt for hardwoods like oak or maple, which are less attractive to carpenter bees.
- Install Traps: Place carpenter bee traps around your property to capture and reduce the population.
- Seal Cracks and Holes: Regularly inspect and seal any cracks or holes in your wooden structures to eliminate potential nesting sites.
- Apply Insecticide: Consider treating vulnerable areas with an insecticide specifically designed for carpenter bees, following safety guidelines.
Final Toughts
Repairing carpenter bee damage is essential to maintain the beauty and integrity of your wooden structures. By following these steps, you can effectively restore damaged wood and take preventive measures to protect against future infestations. Remember, early detection and timely repairs are key to keeping your home in top condition and free from carpenter bee damage.
FAQs
1. How can I tell if carpenter bees are still active in the damaged wood? Look for fresh sawdust, listen for buzzing sounds, and observe if bees are entering or exiting the holes.
2. Can I use regular wood filler for deep tunnels? Regular wood filler is suitable for small holes, but for deeper tunnels, use a syringe to inject the filler or consider using a specialized product designed for larger repairs.
3. How often should I inspect my wooden structures for carpenter bee damage? Inspect your wooden structures at least twice a year, preferably in the spring and fall, to catch any new damage early.
4. Is it necessary to paint over repaired areas? Yes, painting or staining repaired areas not only improves the appearance but also provides a protective barrier against future infestations.
5. Can I prevent carpenter bees without using chemicals? Yes, using hardwood, painting or varnishing wood, sealing cracks, and installing traps are effective chemical-free methods to deter carpenter bees.