Carpenter bees are a common nuisance for homeowners, especially those with wooden structures. Unlike their honeybee cousins, carpenter bees prefer to carve out tunnels in wood, which can weaken your structures over time. While these bees are not typically aggressive, their burrowing behavior can cause significant damage if left unchecked.
Plugging carpenter bee holes is essential to prevent further damage, but what’s the best way to do it? Should you use wooden corks or opt for a filler? Both methods have their merits, but depending on your specific needs, one might be easier or more effective than the other. In this article, we’ll dive into the pros and cons of using wooden corks versus filler for sealing carpenter bee holes and provide guidance on which method might be the best fit for your home maintenance needs.
Why Plugging Carpenter Bee Holes Matters
Before we compare methods, it’s important to understand why plugging carpenter bee holes is crucial. Left open, these holes can invite not just more bees but also moisture, which can lead to rot and decay of the wood. In some cases, other pests might use these tunnels, compounding the problem.
By sealing these holes, you:
- Prevent Further Infestation: Sealing off existing holes stops bees from reusing them or expanding the tunnels.
- Protect Structural Integrity: By blocking entry points, you preserve the strength of your wooden structures.
- Enhance Appearance: Plugging holes helps maintain a neat, well-kept look, particularly on visible surfaces like decks, porches, or fences.
Method 1: Using Wooden Corks to Plug Carpenter Bee Holes
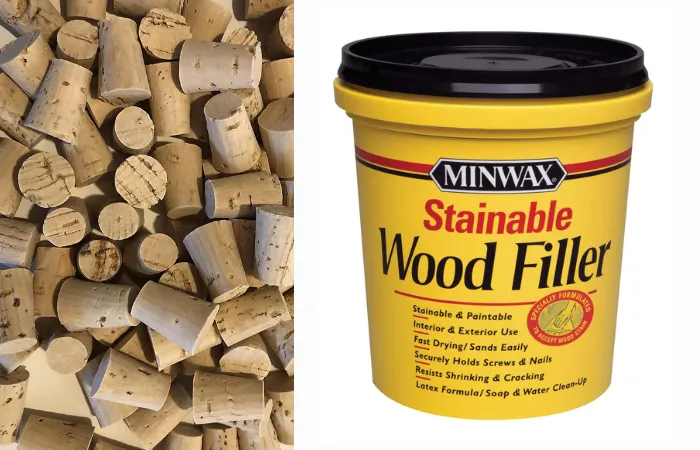
Wooden corks, often made from dowels or specific wood plugs, are a popular choice for filling carpenter bee holes. Here’s why they work well:
Pros of Wooden Corks
- Natural Aesthetic: Wooden corks blend seamlessly with wooden structures and can be stained or painted to match.
- Durability: They provide a solid plug that resists weathering better than some fillers, especially in outdoor environments.
- Simple Installation: Corks can be easily inserted into holes, often with just a mallet and some wood glue for added security.
- Long-Term Solution: Properly installed wooden corks can last for years, providing a long-term fix that doesn’t require frequent maintenance.
Cons of Wooden Corks
- Size Specificity: You’ll need to match the cork size precisely to the hole, which can be a hassle if the holes vary.
- Initial Cost: High-quality corks or dowels can be more expensive upfront compared to basic fillers.
- Installation Time: It can take a bit longer to fit and secure corks properly, especially if sanding or finishing is needed.
How to Use Wooden Corks
- Measure the Holes: Determine the diameter of each hole to select the right cork size.
- Prepare the Corks: Cut corks to the appropriate length and sand edges if needed.
- Insert with Adhesive: Apply wood glue around the cork’s edge for a secure fit, then gently tap it into the hole with a mallet.
- Finish as Needed: Sand flush with the surrounding wood and apply stain or paint to match.
Method 2: Using Filler to Plug Carpenter Bee Holes
Wood filler, whether premixed or a putty form, is another go-to solution for sealing carpenter bee holes. It’s versatile and can be used in various scenarios, but how does it stack up against wooden corks?
Pros of Filler
- Ease of Use: Filler can be applied quickly without the need for precise measurements or tools beyond a putty knife.
- Versatility: Works well on irregular holes and can be smoothed to blend with surrounding surfaces.
- Cost-Effective: Generally cheaper than buying wooden corks, especially if you need to cover a large area.
- Quick Dry Time: Most fillers dry relatively fast, allowing for a quicker completion time.
Cons of Filler
- Less Durable: Fillers can crack or shrink over time, especially in outdoor conditions with fluctuating temperatures.
- Maintenance Required: May need reapplication every few years as the filler deteriorates or becomes dislodged.
- Potential Mismatch: Unless you’re skilled at blending, filler can be visible and may not perfectly match the surrounding wood.
How to Use Filler
- Clean the Holes: Ensure all debris and bee remnants are removed from the holes.
- Apply the Filler: Use a putty knife to pack the filler into the hole, ensuring it’s fully filled and slightly overfilled to allow for shrinkage.
- Smooth and Sand: Once dry, sand the area smooth and touch up with paint or stain as needed.
Wooden Corks vs. Filler: Which is Easier?
When it comes to ease of use, filler generally wins due to its simplicity and quick application process. However, wooden corks offer superior durability and a more natural look, which can be worth the extra effort.
Here’s a quick comparison:
| Feature | Wooden Corks | Filler |
|---|---|---|
| Installation | Requires measuring and cutting | Easily applied with a putty knife |
| Durability | Long-lasting and weather-resistant | Can crack or shrink over time |
| Aesthetic Match | Blends naturally with wood | May require painting to match |
| Cost | Higher upfront cost | Generally more affordable |
| Maintenance | Minimal once installed | May need periodic reapplication |
| Time | More time-consuming to install | Quick to apply and finish |
Best Scenarios for Each Method
- Use Wooden Corks When:
- You need a long-term solution that blends seamlessly with your woodwork.
- The aesthetic is important, such as on visible or decorative wood surfaces.
- You’re sealing holes in areas that face significant weather exposure.
- Use Filler When:
- You need a quick, easy fix that requires minimal tools or preparation.
- The holes are irregular in size, making it challenging to use standard corks.
- Cost is a concern, and you’re dealing with a large number of holes.
Final Toughts
Choosing between wooden corks and filler for plugging carpenter bee holes ultimately comes down to your priorities: ease of application versus durability and aesthetics. Wooden corks offer a natural and long-lasting solution, perfect for those who value appearance and want to minimize maintenance. On the other hand, fillers provide a quick and cost-effective fix, especially suited for irregular holes or less visible areas.
Whichever method you choose, the key is to act promptly to seal those holes and protect your wooden structures from further damage. By taking the time to address carpenter bee holes with the right approach, you’ll not only keep your home looking its best but also prevent future infestations. So, gather your tools, choose your method, and plug those holes with confidence!


