Carpenter bees are notorious for boring into wooden structures, creating unsightly holes that can weaken the integrity of your property over time. If left untreated, these holes can invite other pests and cause further damage. Sealing carpenter bee holes is a crucial step in protecting your home or outdoor structures from ongoing infestations and preserving the wood. This article will provide an in-depth guide on how to properly seal carpenter bee holes, including the best materials to use, the steps involved, and tips for preventing future infestations.
Understanding Carpenter Bee Damage
Before diving into the sealing process, it’s important to understand the type of damage carpenter bees cause and why it’s essential to address it:
- Wood Boring Behavior
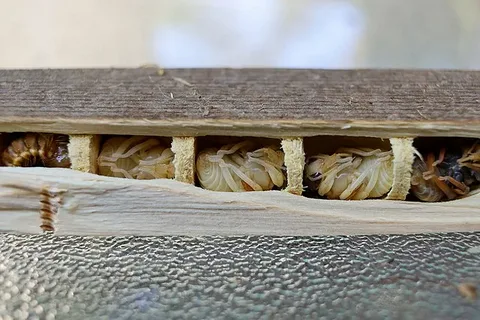
- Carpenter bees bore into wood to create tunnels where they lay their eggs. These tunnels can be several inches deep and often follow the grain of the wood, making them difficult to detect from the surface.
- Structural Impact
- Over time, multiple generations of carpenter bees may use the same entry holes, expanding the tunnels and causing significant structural damage. This can weaken the wood and lead to costly repairs.
- Attraction of Other Pests
- Open carpenter bee holes can attract other pests, such as ants, termites, or woodpeckers, which can exacerbate the damage.
Preparing to Seal Carpenter Bee Holes
Proper preparation is key to successfully sealing carpenter bee holes. Follow these steps before you begin:
- Inspect the Damage
- Locate All Holes: Carefully inspect your wooden structures to locate all carpenter bee holes. Pay close attention to areas under eaves, decks, and siding where bees are likely to nest.
- Check for Active Infestations: Before sealing, ensure that the holes are no longer active. Look for signs of carpenter bee activity, such as fresh sawdust or buzzing near the holes.
- Treat the Holes
- Apply Insecticidal Dust: If you suspect that carpenter bees are still inside the holes, apply insecticidal dust into each hole using a bulb duster. This will kill any remaining bees and prevent them from emerging after you’ve sealed the holes.
- Wait 24-48 Hours: Allow the dust to work for 24-48 hours before sealing the holes to ensure all bees are exterminated.
- Gather Materials
- Exterior Wood Filler or Caulk: Choose a high-quality exterior wood filler or caulk to seal the holes. Wood filler is ideal for larger holes, while caulk works well for smaller ones.
- Putty Knife: Use a putty knife to apply the wood filler or caulk and smooth it out.
- Sandpaper: Fine-grit sandpaper (220-grit) is needed to smooth the filled holes after the material has dried.
- Paint or Stain: To finish the job, have paint or stain on hand that matches the surrounding wood.
Sealing Carpenter Bee Holes
Now that you’re prepared, follow these steps to seal the carpenter bee holes:
- Clean the Holes
- Remove Debris: Use a small brush or compressed air to remove any debris or loose wood from the holes. This will help the filler or caulk adhere better.
- Ensure Dryness: Make sure the holes are completely dry before applying any sealant to avoid trapping moisture inside.
- Apply Wood Filler or Caulk
- Fill the Holes: Using a putty knife, press the wood filler or caulk firmly into the hole, filling it completely. Ensure that the material reaches the depth of the tunnel to prevent bees from re-entering or new ones from excavating the same spot.
- Smooth the Surface: Smooth the surface of the filled hole with the putty knife, removing any excess material. This will create a flush finish that blends in with the surrounding wood.
- Let It Dry
- Drying Time: Allow the wood filler or caulk to dry completely according to the manufacturer’s instructions, usually 24-48 hours.
- Sand the Area
- Smooth the Filled Holes: Once the filler or caulk is dry, use fine-grit sandpaper to smooth the area and ensure it matches the surrounding wood. Sand lightly to avoid removing too much material.
- Paint or Stain
- Apply Paint or Stain: To match the filled holes with the rest of the wood, apply a coat of paint or stain. This not only improves the appearance but also adds an extra layer of protection against future carpenter bee infestations.
Preventing Future Carpenter Bee Infestations
Sealing carpenter bee holes is only part of the solution. To prevent future infestations, consider these preventative measures:
- Paint or Stain All Exposed Wood
- Create a Barrier: Carpenter bees prefer bare, untreated wood. Painting or staining all exposed wood surfaces will make them less attractive to these pests.
- Use Wood Preservatives
- Apply a Repellent: Consider applying a wood preservative with a natural repellent, such as citronella or eucalyptus oil, to deter carpenter bees from nesting in the wood.
- Install Protective Covers
- Cover Vulnerable Areas: Install protective covers, such as metal flashing or fine mesh screens, over areas where carpenter bees are likely to nest, such as eaves, soffits, and fascia boards.
- Regular Inspections
- Monitor for New Holes: Regularly inspect your property for signs of new carpenter bee activity. Early detection and treatment can prevent extensive damage.
- Consider Professional Help
- Hire an Exterminator: If you’re dealing with a large or persistent infestation, it may be worth hiring a professional exterminator to treat and prevent carpenter bee damage effectively.
Conclusion
Sealing carpenter bee holes is an essential step in protecting your wooden structures from further damage. By properly preparing, treating, and sealing the holes, and taking steps to prevent future infestations, you can maintain the integrity and appearance of your property. Regular maintenance and vigilance will help ensure that carpenter bees don’t return, allowing you to enjoy your outdoor spaces without worry.
Resources
- Carpenter Bee Control Products: Visit DoMyOwn for a selection of insecticidal dusts, fillers, and repellents.
- Wood Repair and Maintenance: The Family Handyman offers tutorials on repairing and maintaining wood structures.
- Pest Control Professionals: Find a local pest control professional through Angi to assist with severe carpenter bee infestations.
FAQs
- Why is it important to seal carpenter bee holes?
- Sealing carpenter bee holes prevents further damage to the wood and deters future infestations by eliminating potential nesting sites.
- What is the best material to use for sealing carpenter bee holes?
- Exterior wood filler or caulk are the best materials for sealing carpenter bee holes, as they provide a durable, weather-resistant seal.
- Should I treat the holes before sealing them?
- Yes, it’s important to apply insecticidal dust to the holes before sealing to ensure any remaining carpenter bees are exterminated.
- Can I seal carpenter bee holes with paint alone?
- No, paint alone is not sufficient. You should first fill the holes with wood filler or caulk before painting to properly seal them.
- How can I prevent carpenter bees from returning after sealing the holes?
- To prevent carpenter bees from returning, paint or stain all exposed wood, apply wood preservatives with natural repellents, and install protective covers over vulnerable areas.
